
Uncategorized

The End (And The Beginning Again)
Of all the blog posts I write, this one has to be the hardest.
Because this is the final blog post I will write as a Grad School Foodie…
As I sit here, I look back on the past three years and reflect on the food, the lessons, the memories, and the people I have met along the way. From learning how to create and operate a blog to honing my skills in the kitchen to learning all about food photography to applying some of that hard-earned nutrition knowledge to my posts, I have seen, learned, and experienced so much. They were the best three years of my life and I am so lucky to have lived them.
But as with all good things, my time as a Grad School Foodie has come to an end. I’m officially graduated from both graduate school and internship and in possession of the most valuable piece of paper ever, my RD credentials. I have achieved everything I hoping for when I first downloaded WordPress onto my computer those three years ago.
As I say farewell to my Grad School Foodie adventures, I look forward and say hello to my next step – being a registered dietitian and helping people live healthier and happier lives.
Many thanks for joining me on my grad school adventures!
oxox,
C
PS – You didn’t think you were going to get rid of me that easily, right??
I may not be a Grad School Foodie anymore, but I will always be a blogger at heart! Join me on my new adventures as a registered dietitian at Simply A (RD) Foodie. Same me, same food, and same goofiness just in a slightly different format (plus all the posts from here are there too, so no need to freak about missing out on your favorites!).
Share this:
The Last Thursday of October
Can you believe that this is the last Thursday in October?
Seriously, where did this month go?
I always get a little sad when October ends because it seems like all the fall activities are officially over. All the apples have been picked, all the pumpkins have been carved, and all the Halloween candy has (almost) been eaten.
But that doesn’t mean that the memories of a fun month have to go away too!
And what a month it was!
It was a month filled with:

An amazing sister weekend with my two favorite people.

A farm store that was loaded with perfectly imperfect pumpkins (I’ll take them all please)…
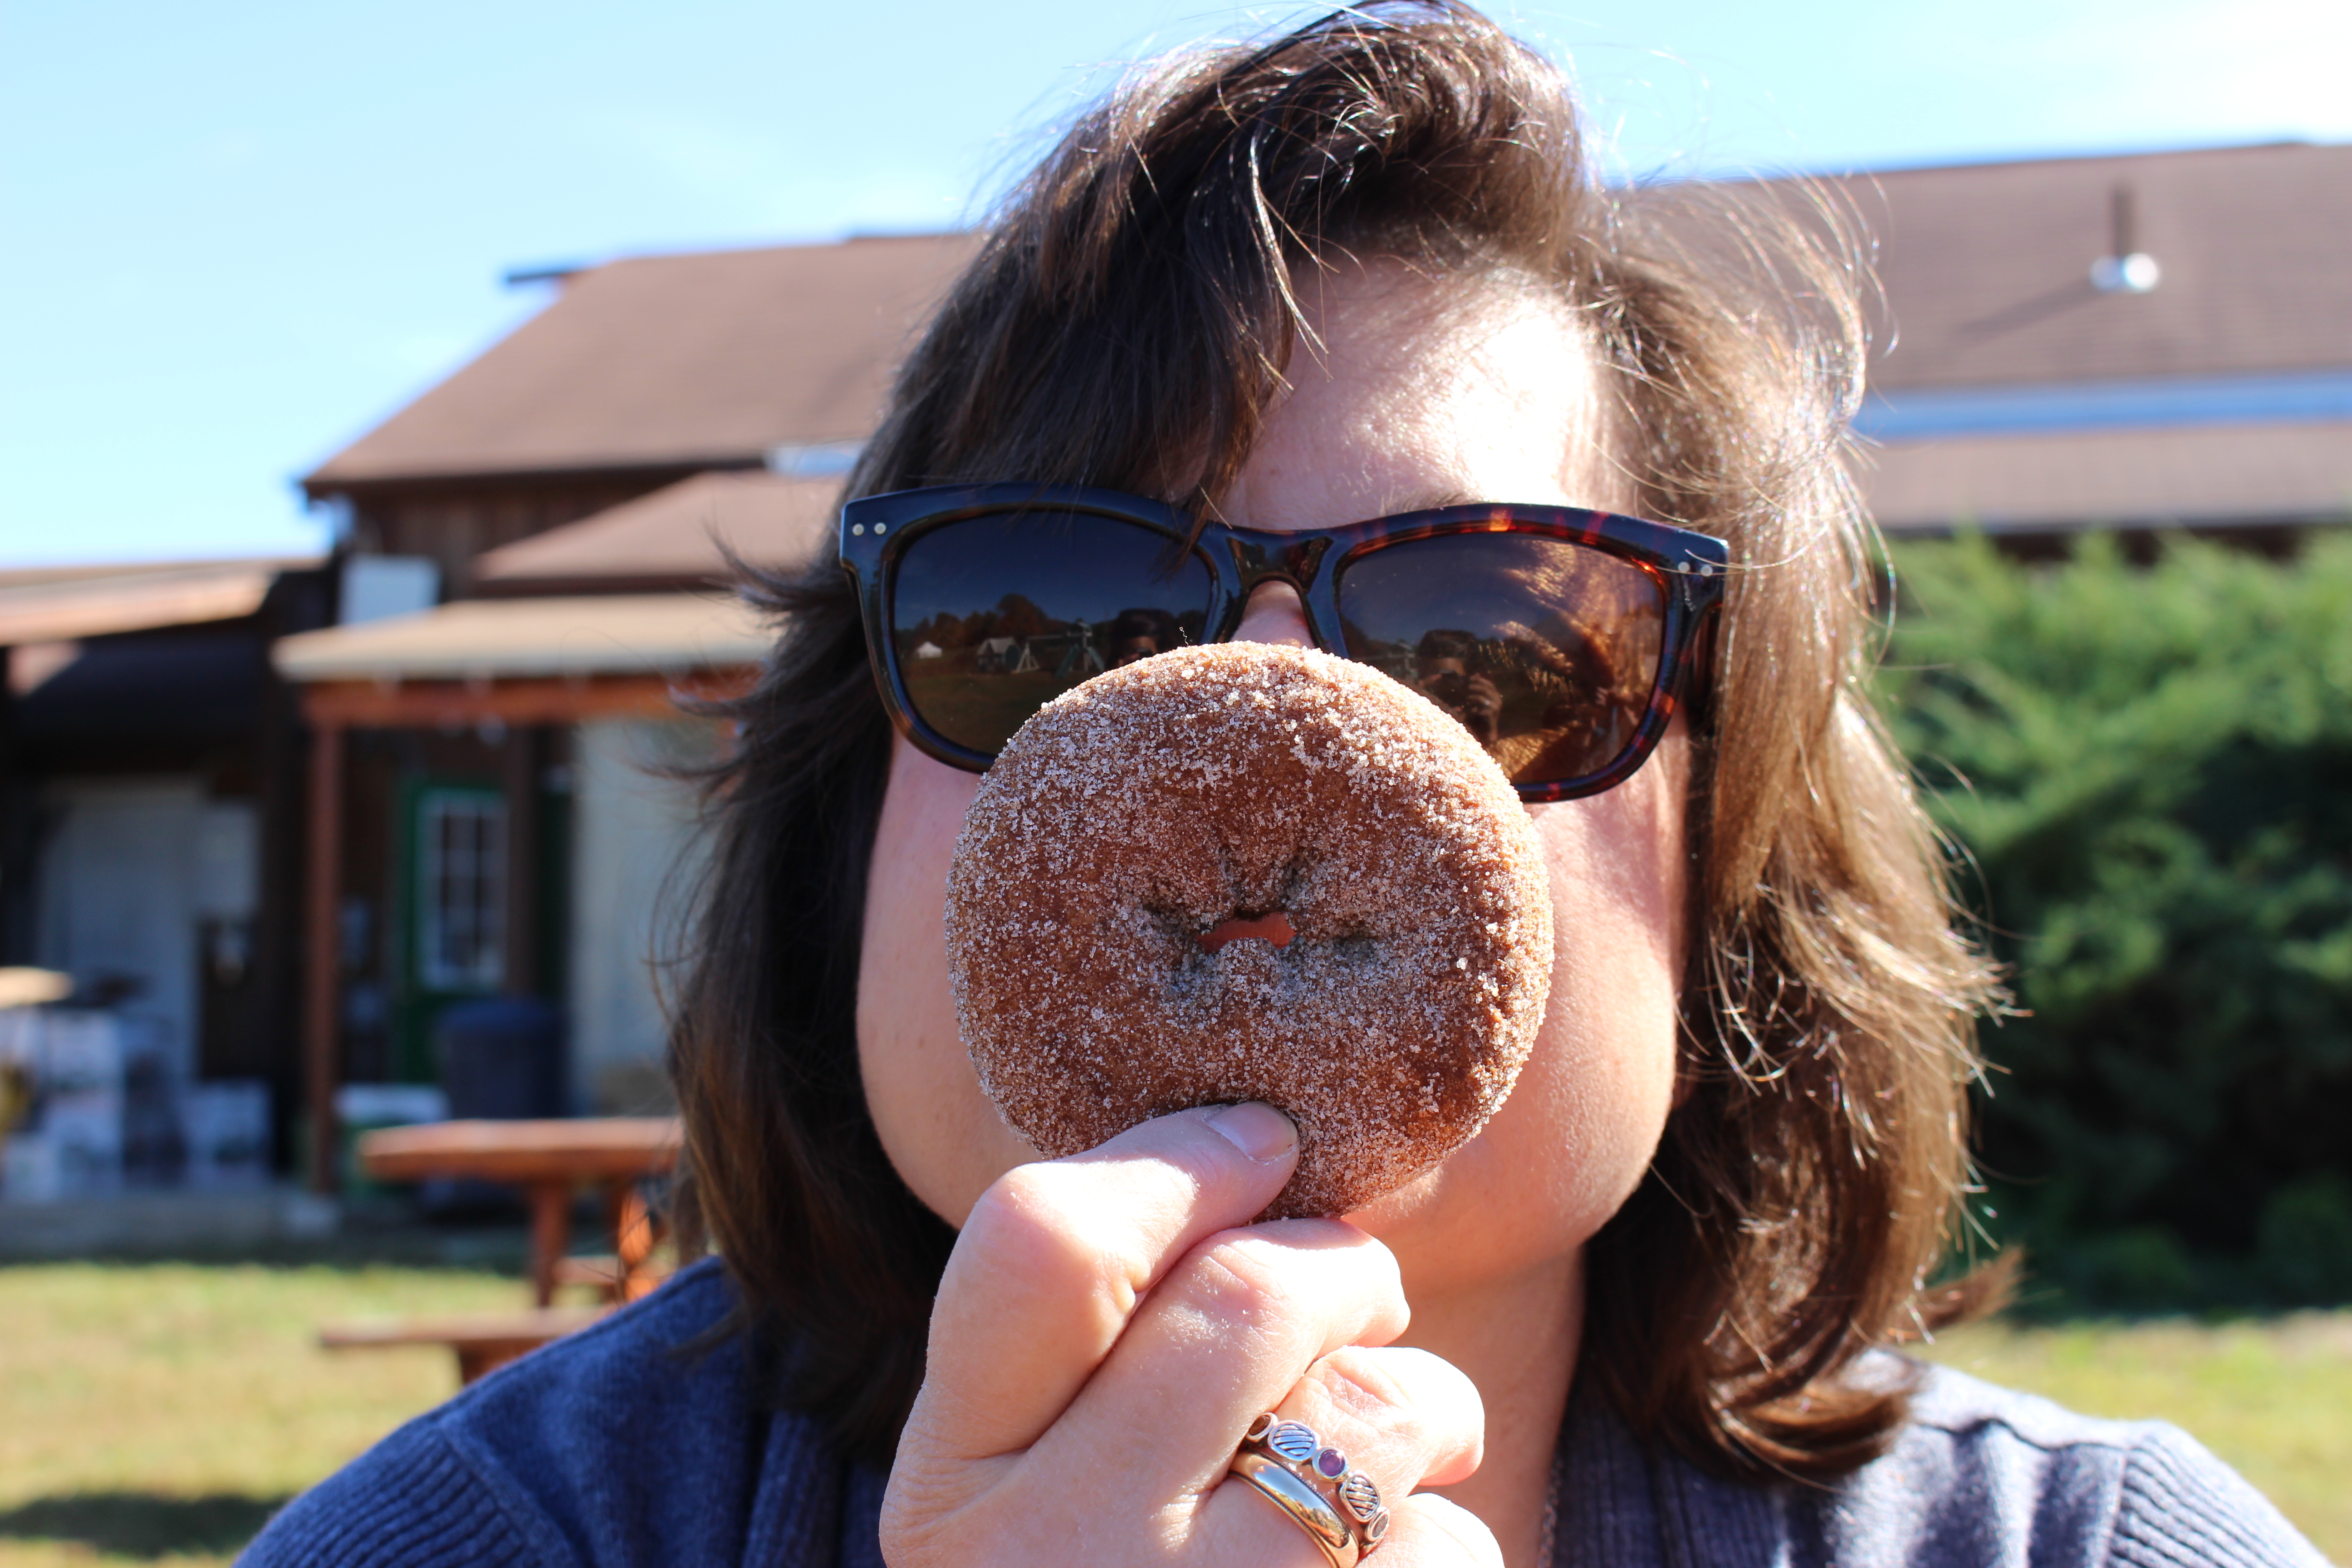
… and delicious cider donuts!

A quest to find the perfect leaf.
A time to go to the maze, get scared silly, then take weird selfies in the “mirrors” while waiting for your mom to decide on which path to take.
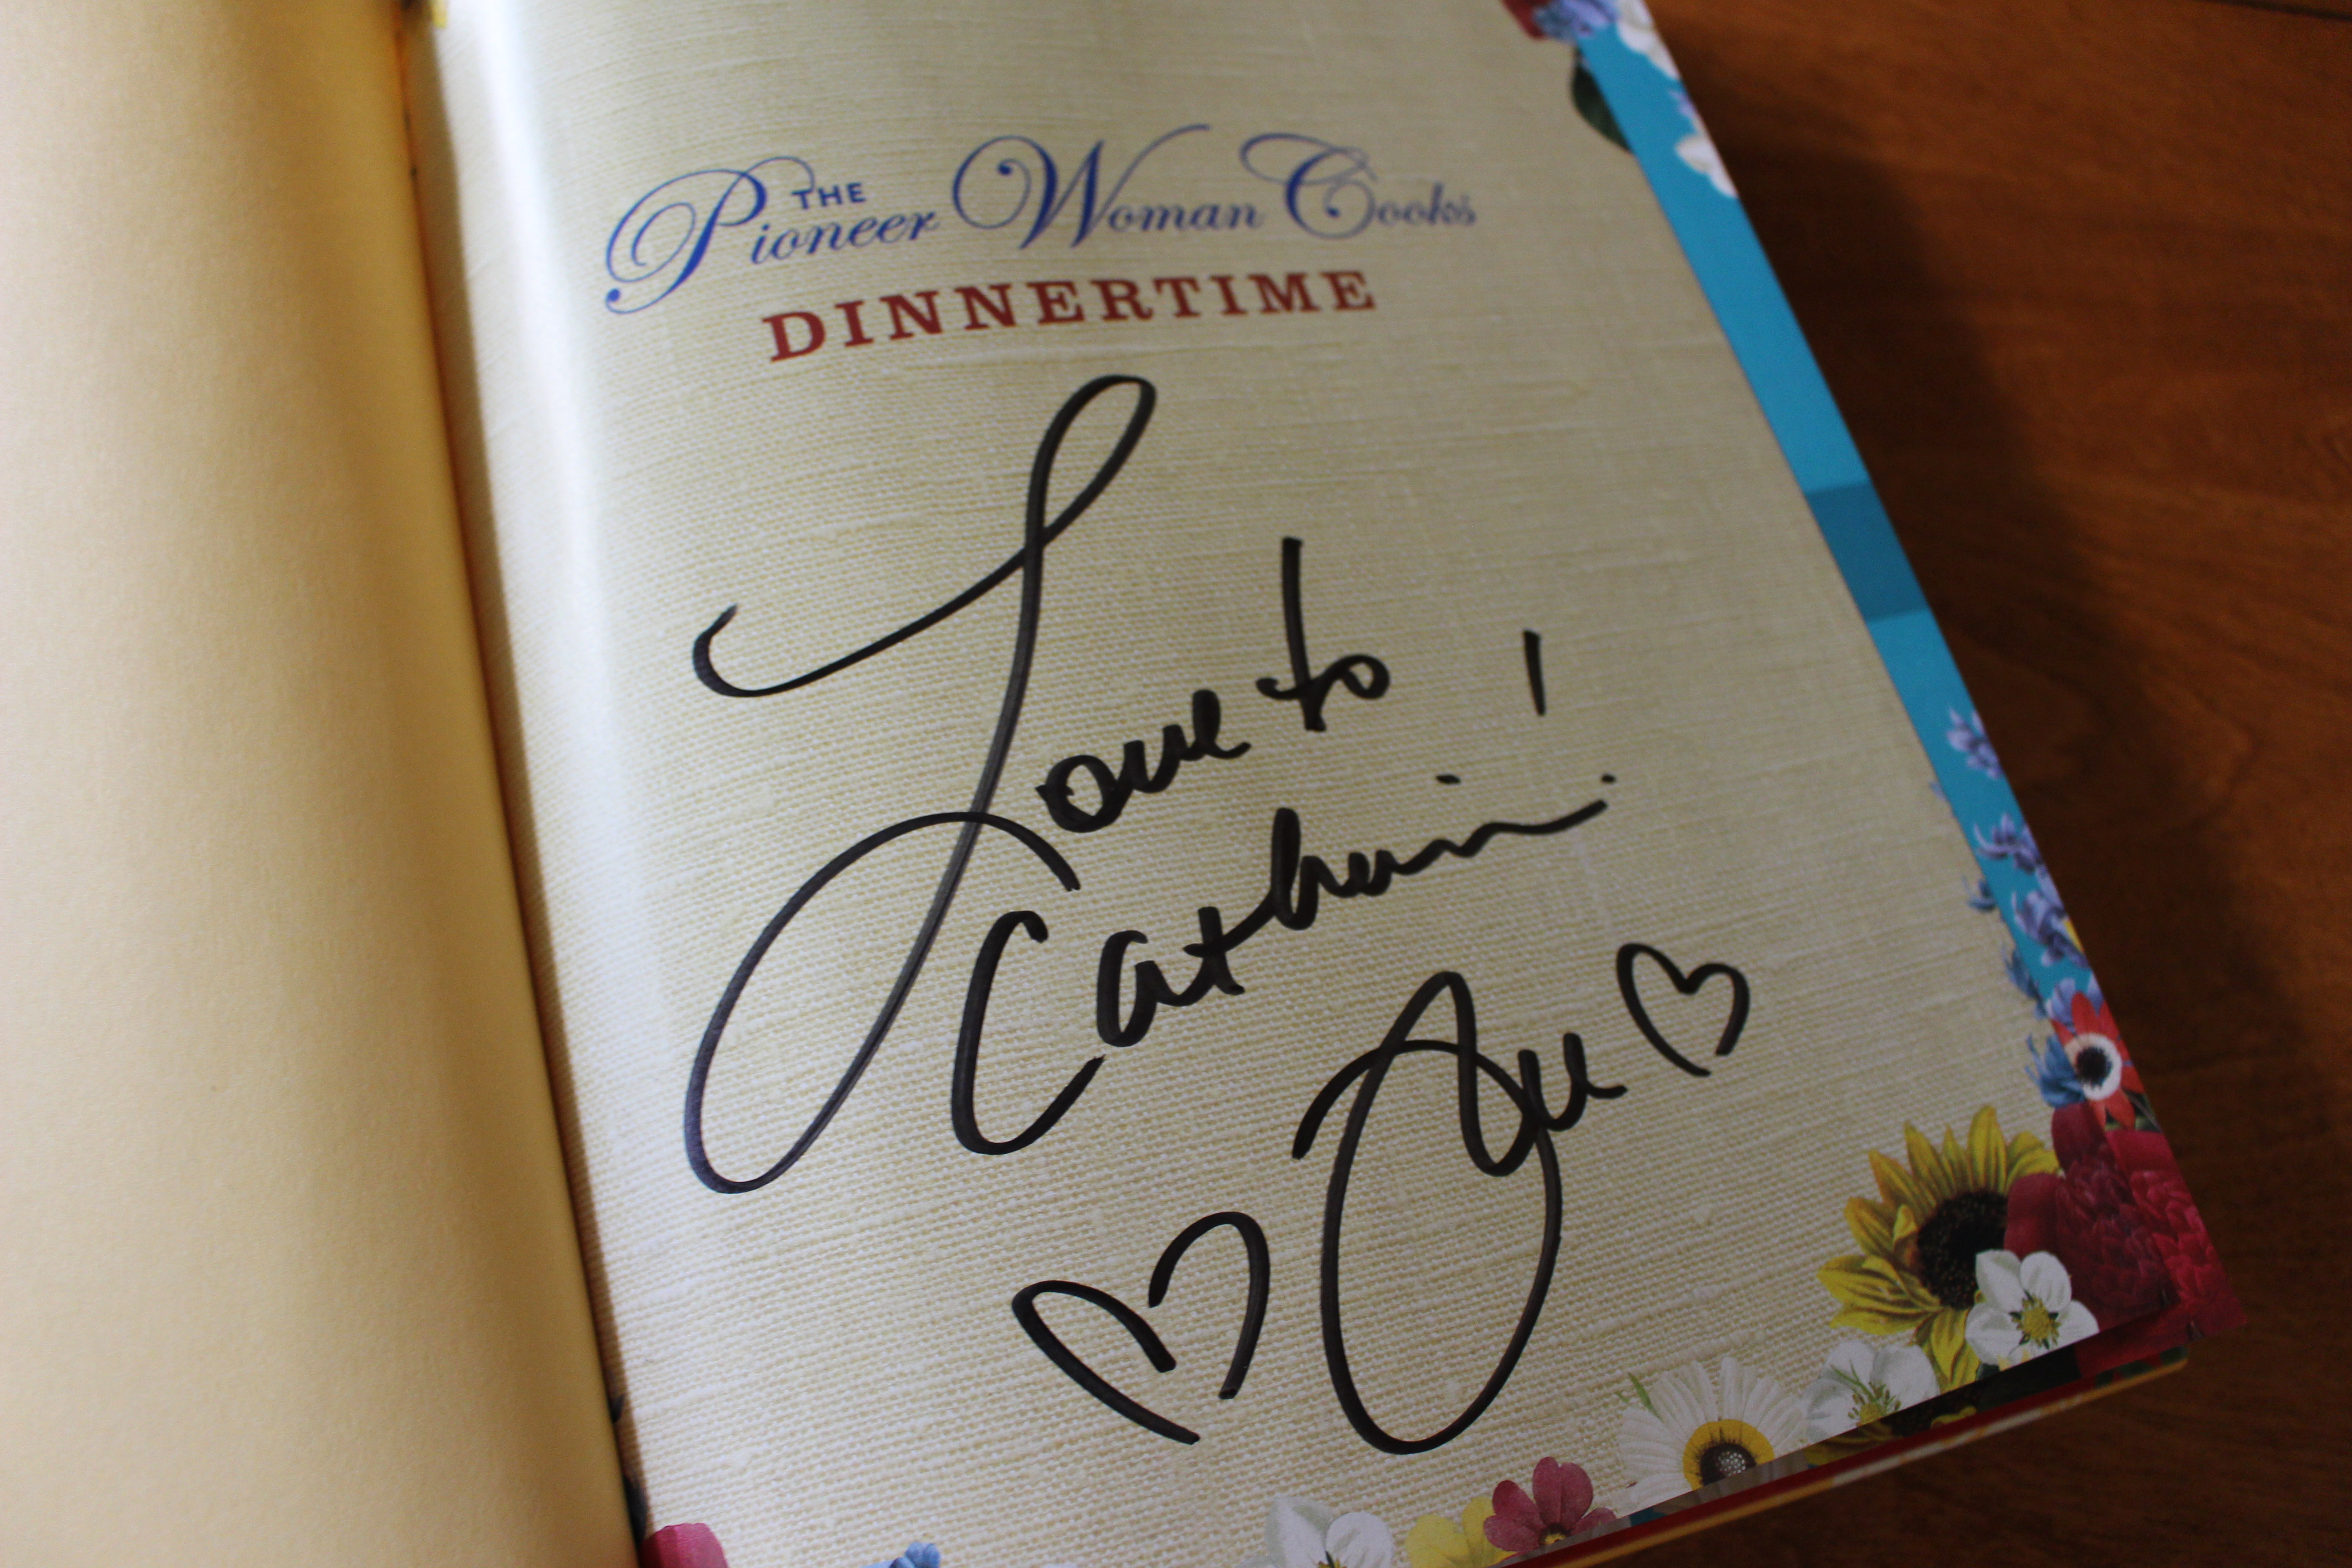
An opportunity to meet inspirational people (Hi, Ree! It was a pleasure to meet you!).
While it is sad to start seeing October go, it truly has been an amazing month!
Your fall lovin’ friend,
C
Share this:


Halloween Recipe Roundup
Hi, kiddos!!!
Can you believe that it’s the last Monday in October?
And that Halloween is on Saturday?
Which means that Halloween can be an all-day affair!! (so invite all your favorite people over and let the festivities begin!)
In honor of Halloween falling on the weekend, I have rounded up some of my favorite recipes that you can serve throughout the day to your costumed, candy cravin’ crew.
For Breakfast:

Pumpkin pancakes are a simple breakfast that can be whipped up in no time, feeds a crowd, and highlights the star of the season – definitely a family friendly Halloween breakfast!

If you want something pumpkin-free for breakfast, these Banana Walnut Pancakes are a sure-fire hit (plus they still have all the delicious fall spices inside).

Pumpkin bread may not seem like breakfast fare for many people, but there is nothing better than having a slice with a cup of coffee or tea before all the Halloween craziness begins…
For Lunch/Dinner:
This Spicy Butternut Squash soup is simple to throw together earlier in the day, pop into the fridge, and then reheat for lunch or dinner. This soup is spicy, so if you’re serving it to people who are sensitive to spice, pull back a bit on the cayenne pepper.

If you want to fuel up your little trick-or-treaters before a night of candy hunting, these Stuffed Acorn Squash Halves fit the bill. They are full of the flavors of the season and are absolutely delicious.
For Dessert (because candy can’t be the only thing sweet!):

Mini Pumpkin Chocolate Chip Muffins are my go-to, absolutely favorite dessert for Halloween. Pumpkin + Chocolate = Friends Forever.

If you want a fancier dessert for your Halloween table, Apple “Jack” Donut Cake is not only delicious but beautiful as well. Bonus? You can make it the day before – it gets better as it sits!
Have a great week leading up to Halloween, everyone!
oxox,
C
Share this:


Apple “Jack” Donut Cake

As you have learned from the past few weeks of blog posts, I love fall. From the changing leaves to the pumpkins everywhere to the seasonal foods, fall is definitely my favorite season.
One of my favorite fall traditions is going with my family to a local farm to buy apples, look at all the different pumpkins and gourds, and dig into fresh apple cider donuts. A relaxing day spent with the people I love… and cider donuts.
Apple cider donuts are an interesting food. They are soft, cake-like, and spiced on the inside with a firm outer crust that is covered in sweet sanding sugar… basically the perfect balance of textures and flavors. I love apple cider donuts so much that I actually had them instead of cake for my 6th birthday!
The apple farm is usually swamped on weekends, so apple cider donuts have been hard to come by this season. But when my mom showed me a recipe that she saw on Facebook for APPLE CIDER DONUT CAKE, I was sold. We had to make it and we had to make it now.
With a few tweaks, I think we made a pretty delicious cake. There are a couple stages of ingredients and steps, but the results are definitely worth it.
It starts with the dry ingredients.

In a large bowl, I combined flour, baking powder, baking soda, salt, cinnamon, nutmeg, and allspice. Then set the bowl aside as I got the wet ingredients together.
The first component of the wet ingredients is an apple puree that is made from boiling cubes of apple in apple cider until they are soft and tender.
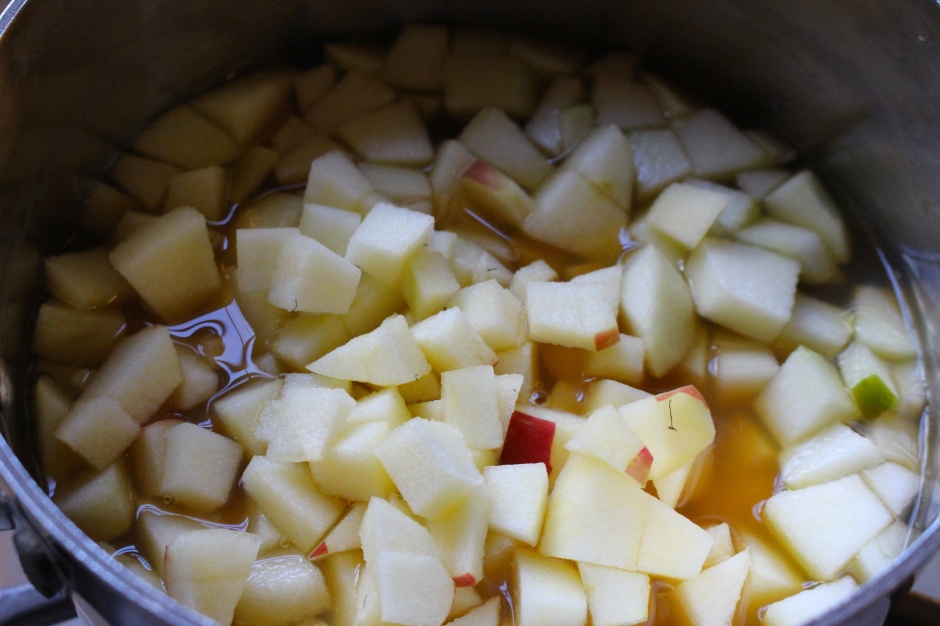
Any firm apple works here – I personally like granny smith or gala apples the best!
When the apples are tender, let the mixture cool slightly before transferring it to a blender or food processor. NOTE: when blending a hot liquid, only fill the blender up halfway and crack the top open and cover with a tea towel. This will prevent the top from flying off and hot apples going everywhere.

Puree until completely smooth. Pour out one cup of the apple puree mixture – if there is not enough apple puree, add in some more apple cider to make up the difference. Then add in a ¼ cup skim milk – stir to combine and then set aside.
Now it’s time to bring out the big guns… your stand mixer!

In the bowl of your stand mixer, combine some butter (okay, one stick), some granulated sugar, and some brown sugar. Beat until fluffy.

Then slowly add in three eggs, some vegetable oil, and some vanilla bean paste or vanilla extract and stir until combine. Then, with the mixer on low, add in the dry ingredients alternatively with the apple puree – starting and ending with the dry ingredients. Mix until just combined. I recommend using a spatula to do one last mix to combine anything that is stuck on the bottom of the bowl.
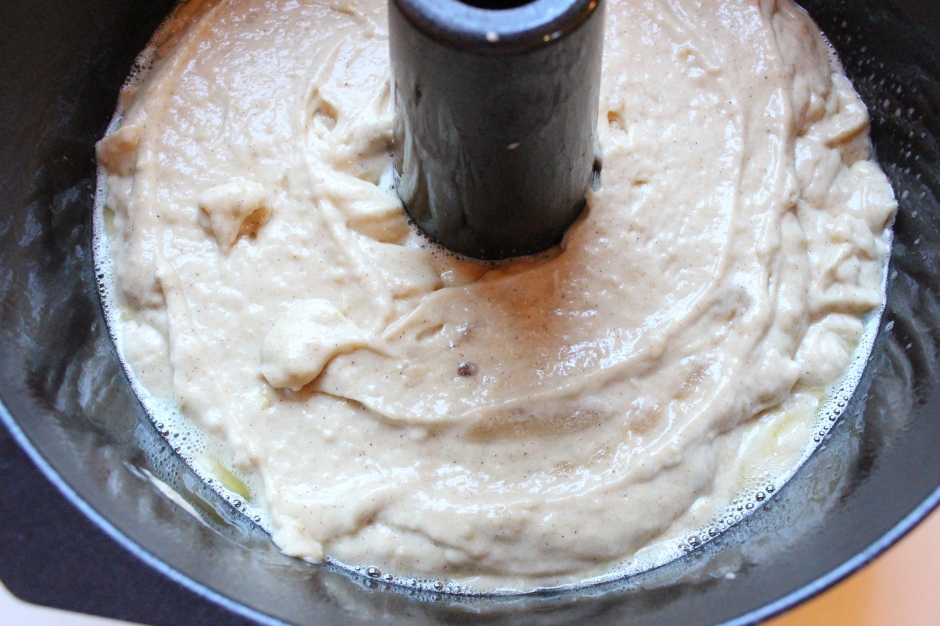
Pour the batter into a bundt pan, preferably one without a fancy pattern – this is a donut, after all! Bake the cake for 35-40 minutes until it is golden brown and a toothpick inserted inside comes out clean.
While the cake is baking, you can whip up the two “toppings” for the cake – a glaze and a cinnamon sugar sprinkle.

For the glaze, heat butter, sugar, and water in a small saucepan over medium heat. When the mixture comes to a boil, let it cook for 1-2 minutes. Remove the syrup from the heat and add in some…

… whiskey! Apples and whiskey (just like bananas and whiskey) go together really well. If you don’t like whiskey, you can substitute some apple cider instead. Then set the glaze aside until the cake is done.
Now, all that’s left is to make the cinnamon sugar.
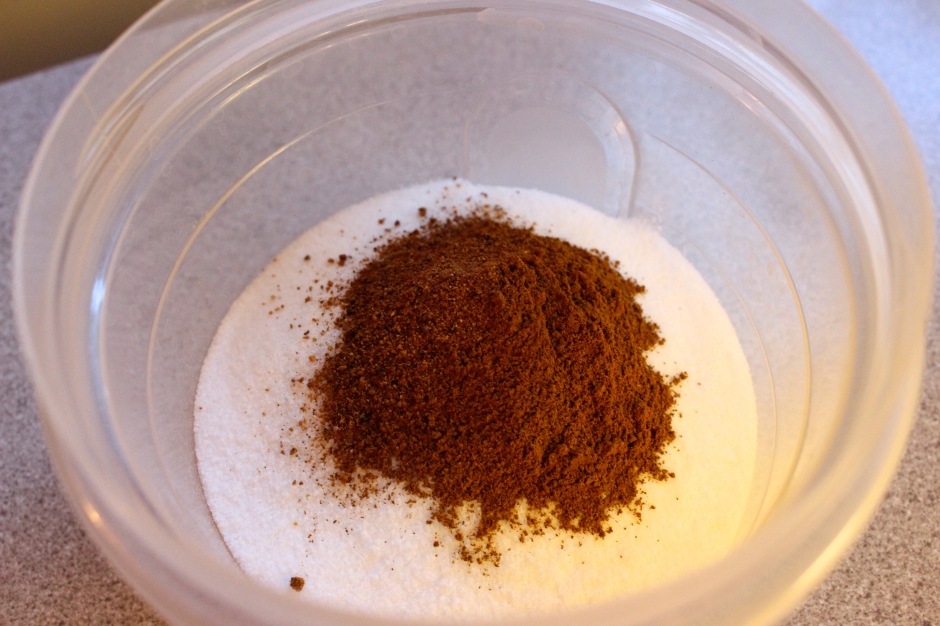
In a jar with a tight-fitting lid, combine sugar, cinnamon, and nutmeg. Screw on the lid and shake vigorously until combined.
Now we assemble!
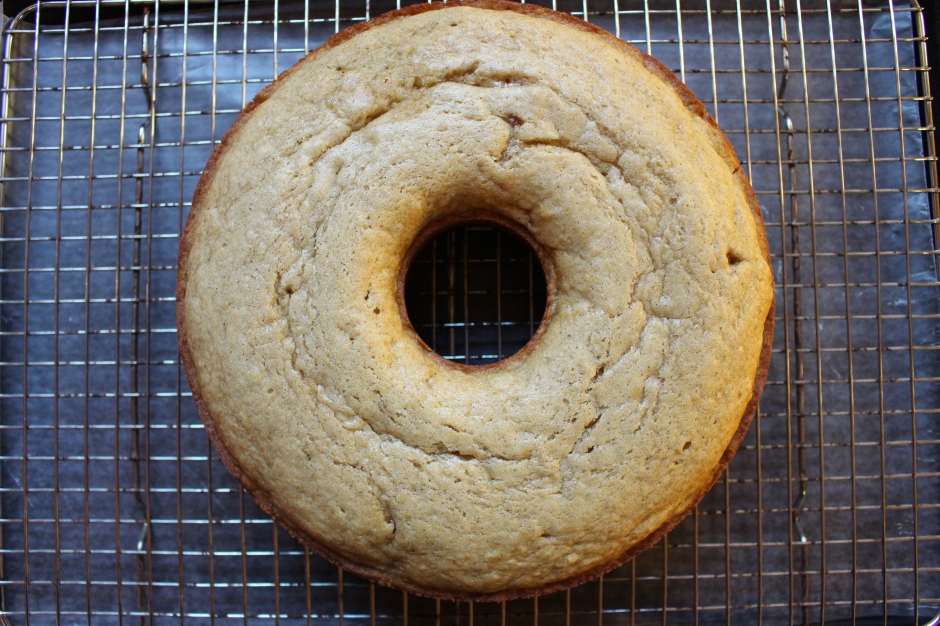
When the cake is done, cool it for a few minutes in the bundt pan then turn it out onto a cooling rack set over a wax paper-lined baking sheet. Let the cake cool slightly.

When the cake has cooled, start to brush the cake with the whiskey syrup. I do this in several stages to allow for maximum syrup soakage.
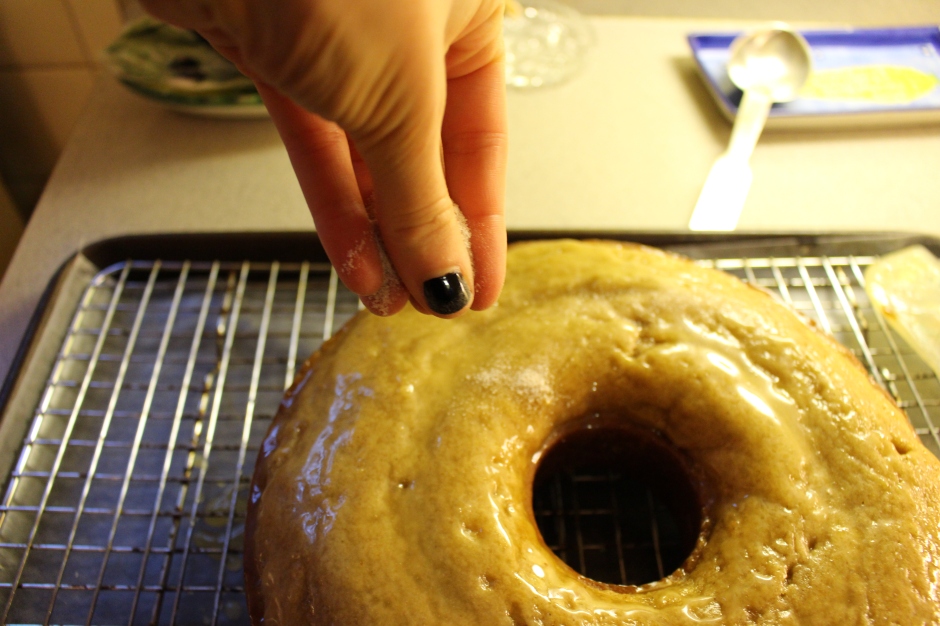
When all the syrup has been brushed on the cake, sprinkle on half the cinnamon sugar mixture onto the cake, making sure to cover the top and the sides. Wait 10 minutes and repeat with the other half of the cinnamon sugar.
Now it’s time to dig in!

Not quite the same thing as a cider donut, but delicious nonetheless… A perfect homage to a childhood favorite!
So, kiddos, do you like cider donuts? What’s your favorite fall food? Let me know!
Your cider donut obsessed friend,
C
Ingredients:
For the cake:
1 firm apple (I like granny smith), peeled and chopped
¾ cup apple cider
¼ cup skim milk
2½ cups all-purpose flour
1½ teaspoons baking powder
½ teaspoon baking soda
1 teaspoon salt
1 teaspoon ground cinnamon
¼ teaspoon ground nutmeg
⅛ teaspoon ground allspice
1 stick unsalted butter, softened
¾ cup granulated sugar
½ cup brown sugar, packed
3 eggs
¼ cup vegetable oil
1 teaspoon vanilla bean paste or vanilla extract
For the glaze:
½ stick unsalted butter
¼ cup granulated sugar
⅛ cup water
¼ cup whiskey
For the cinnamon sugar:
6 tablespoons granulated sugar
1 teaspoon cinnamon
⅛ teaspoon nutmeg
Steps:
- Preheat your oven to 350 degrees. Grease your bundt pan with non-stick cooking spray.
- In a small sauce pan, combine the chopped apple and cider. Bring to a boil, reduce to simmer, and cook for about 10 minutes until the apples are tender. Remove from heat and let cool slightly before blending. If you are using a conventional blender, fill only halfway, slightly crack the lid (to prevent the top from blowing off), and then cover the lid with a towel before blending. If you are using a food processor, only fill to the max liquid line. Blend until completely smooth.
- Measure out one cup of the apple puree – if you do not have enough liquid, add in additional apple cider to make the full amount. Add in the skim milk, stir to combine and set aside.
- In a large bowl, combine the flour, baking powder, baking soda, salt, cinnamon, nutmeg, and allspice. Stir to combine and set aside.
- In the bowl of a stand mixer, add in the butter, granulated sugar, and brown sugar. Beat until light and fluffly, about 2 minutes. Add in eggs one at a time, followed by the vegetable oil and vanilla bean paste/extract. Stir to completely combine, stopping to scrap down the sides.
- With the mixer on low, alternate adding the flour mixture and the apple puree, starting and ending with the flour. Mix until just combined.
- Pour the batter into the prepared bundt pan and bake for 35-40 minutes until the cake is golden brown and a toothpick inserted into the cake comes out clean.
- While the cake is baking, make the glaze. In a small saucepan, combine the butter, sugar, and water and bring to a boil. Let the mixture boil for 1-2 minutes. Remove from heat and add in the whiskey – be careful because the mixture will bubble up! Set aside.
- While the cake is baking, make the cinnamon sugar. In a jar with a tight-fitting lid, combine the sugar, cinnamon, and nutmeg. Screw on the lid and shake vigorously. Set aside.
- When the cake is finished, allow it to cool for about 5-10 minutes in the pan. Turn the cake out onto a cooling rack set over a wax paper-lined baking rack. Let the cake cool completely.
- When the cake has cooled, brush the cake with the glaze – work in batches to cover the top and sides, allowing one coat to sink into the cake before adding in another. When all the glaze has been brushed onto the cake, sprinkle the cake with the cinnamon sugar – I recommend sprinkling half the cinnamon sugar onto the cake, waiting ten minutes for it to set, and then sprinkling on the second half.
Serve alongside a cold glass of milk. Enjoy!
Recipe lightly adapted from: https://leaandjay.wordpress.com/2014/11/07/apple-cider-donut-cake/
Nutrition Information (1 serving):
391 calories • 54gm carbohydrates • 1gm fiber • 4gm protein • 17gm fat • 8gm saturated fat • 330mg sodium • 77mg cholesterol • 2mg iron • 68mg calcium
Share this:

Stuffed Acorn Squash

I love acorn squash.
Absolutely love it.
When it starts to appear in the grocery store in late September, I become obsessed. All I want to do is buy it all, cook it, and dig in. And repeat.
While I love simple baked acorn squash, my friend DK actually gave me a recipe for STUFFED acorn squash a few years ago that took my favorite fall side and turned it into a meal. Needless to say I tried it the same night she gave it to me and have been in love with it ever since.
This dish is the perfect combination of fall flavors – squash, apple, and sausage. Basically, it is October in a meal.
It starts with two acorn squashes that have been washed thoroughly, dried, and cut in half lengthwise. Scoop out the seeds and set the halves cut-side up into a deep-sided baking dish (I used my roasting pan) lined with a silicon baking mat or with some parchment paper.
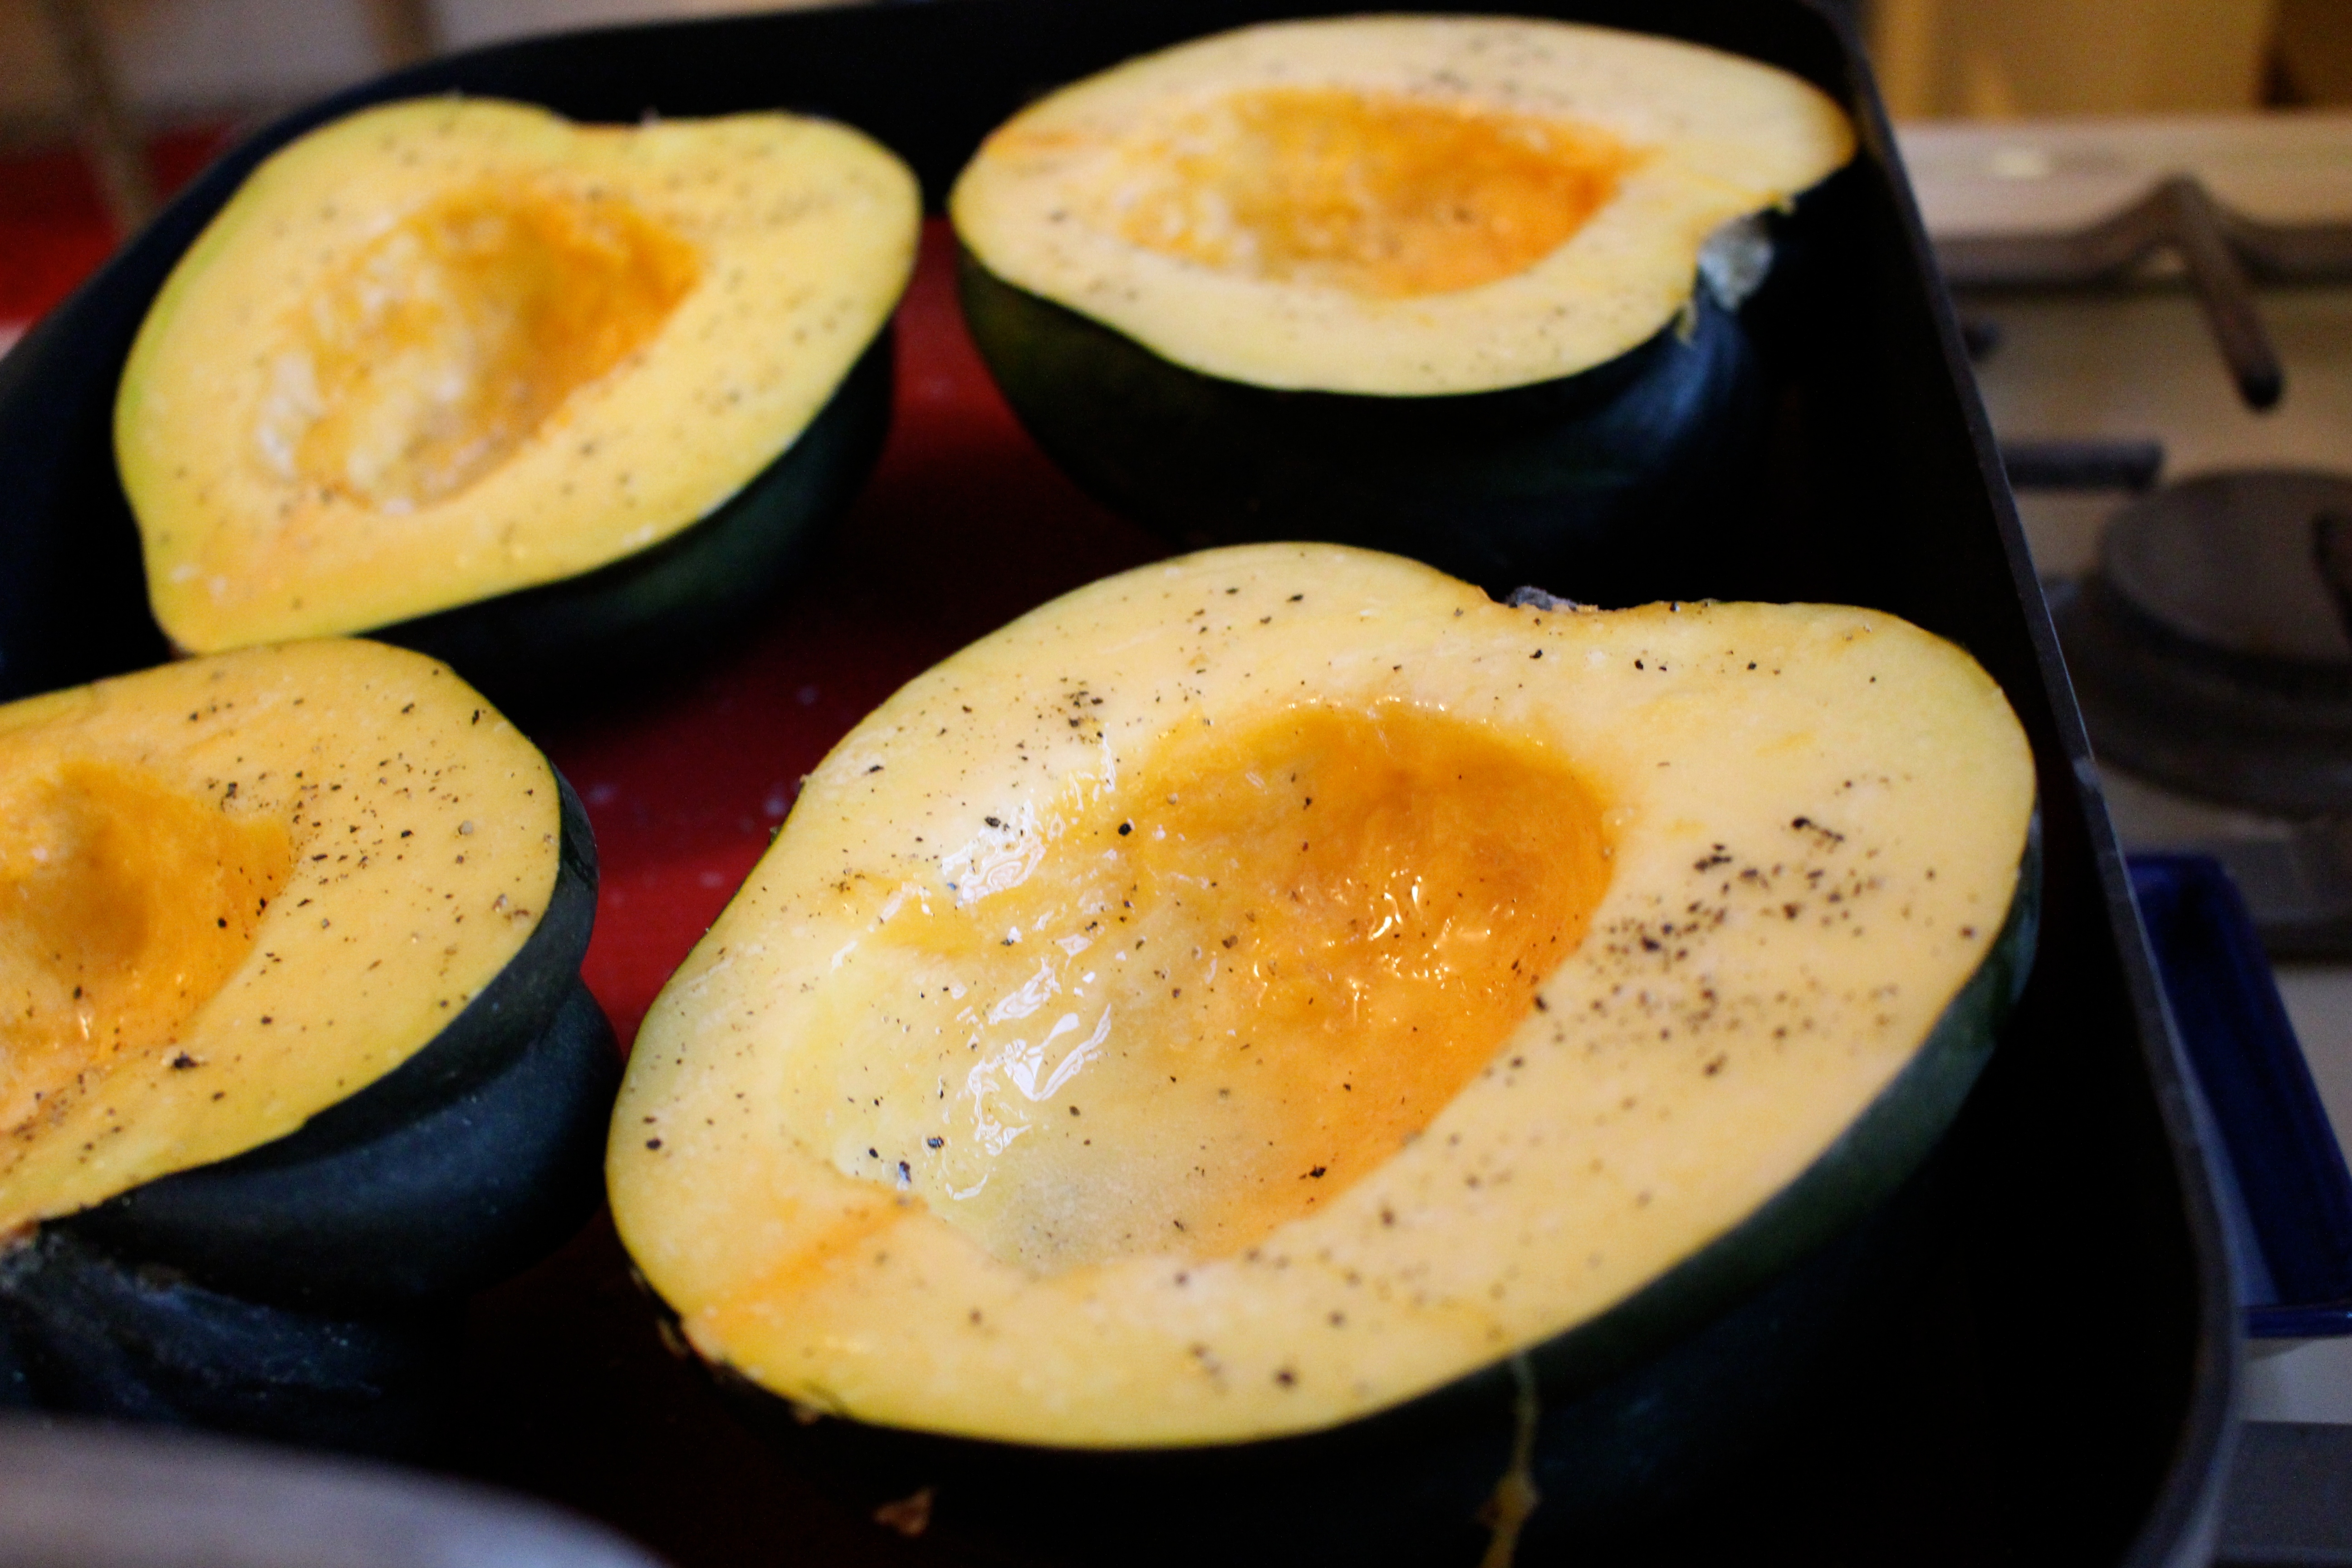
I brushed the cut-sides of the squash with melted butter and seasoned it with salt and pepper. I popped the roasting pan into a 400 degree oven for about 1 hour until the squash is just tender.
While the squash is roasting in the oven, you have plenty of time to whip up the stuffing.

In a large high-sided skillet set over medium-high heat, throw in one pound of sweet Italian sausage – I can only find sweet Italian sausage links at my grocery, so I just slit the casing and peel it off before tossing into the skillet. If you can find bulk Italian sausage though, grab that and use it!

Cook the sausage until it’s all crumbled and brown. Drain the sausage in a colander to remove the excess grease and transfer them to a plate and drain any excess fat from the skillet.

Place the skillet back on the heat, turn it down to medium, and add in about 2 teaspoons of olive oil, some finely diced onion, and finely diced celery.
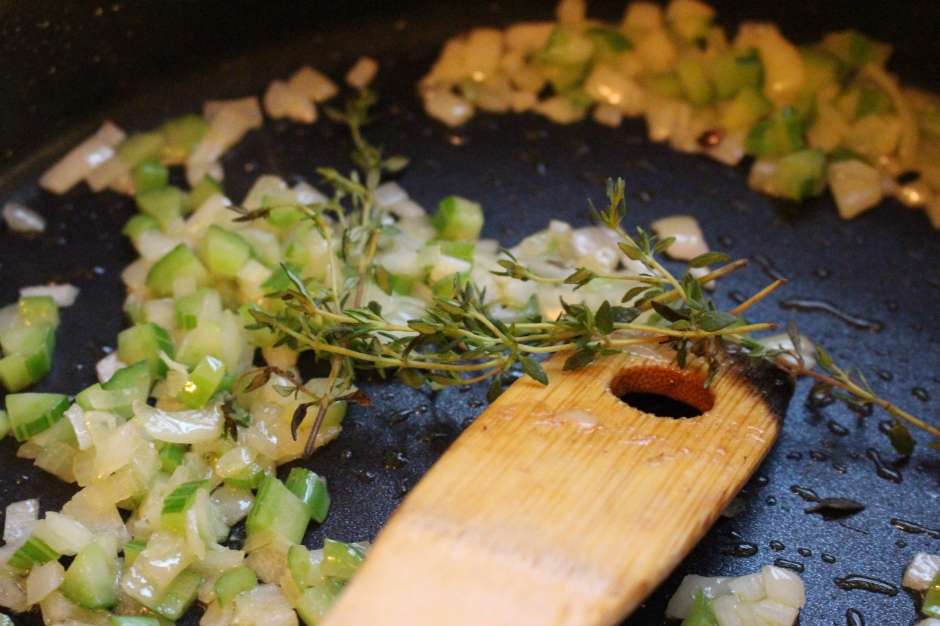
And I threw in a couple sprigs of fresh thyme – it adds a bit of herby freshness to all the rich fall flavors. I cooked the veggies for a couple minutes until they become tender and start to become golden.

Then I threw in some finely chopped apple (that has been peeled first) – I used one gala apple and one granny smith, but any firm apple works here! Sauté the apples and veggies for another couple minutes until everything is soft and tender. Then turn off the heat.
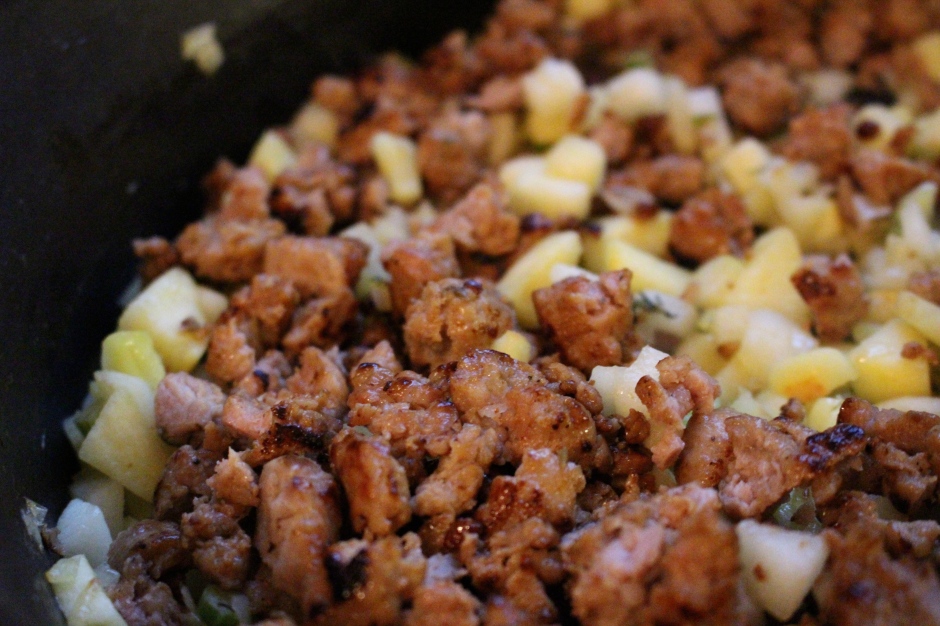
And toss in the cooked sausage and some seasoned bread crumbs to the veggie mixture and stir to combine. Taste the filling and add salt and pepper to taste. Then stir in one beaten egg. Set the filling aside until the squash comes out of the oven.
When the squash is tender, pull it out of the oven.

Fill up the cavity of the squash with the filling. Lightly pack the filling into the cavity, but don’t pack it down too much – if the filling is too compressed, it becomes too dense and doesn’t cook through (raw egg is not awesome). Pop the squash back into the oven and cook the squash until the filling is cooked through and golden brown.
All that you need to do is plate up and chow down. This is definitely a fall dinner winner (say that three times fast!). I hope you enjoy this recipe, kiddos.
Your acorn squash obsessed friend,
C
Stuffed Acorn Squash
Ingredients:
For the squash:
2 medium-to-large acorn squashes, cut in half and seeded
1 tablespoons unsalted butter, melted
Salt and pepper to taste
For the filling:
1 pound sweet Italian sausage
2 teaspoons olive oil
½ cup onion, finely diced
1 celery rib, finely diced
3-4 sprigs fresh thyme
2 apples (I like gala or granny smith), finely chopped
1 cup seasoned breadcrumbs
1 egg, beaten
Salt and pepper to taste
Steps:
Preheat oven to 400 degrees. Line the bottom of a high-sided roasting pan with a silicon baking mat or with some parchment paper.
For the squash: When the oven is at temperature, place the squash halves in the pan, cut side up. Brush the cut sides of the squash with the melted butter and season them with salt and pepper. Place the pan into the oven and roast the squash for about 1 hour or until the squash just become fork tender.
For the filling:
- In a high-sided skillet set over medium-high heat, toss in the sausage and cook until crumbled and browned, about 5 minutes. Remove from the heat and drain the sausage in a colander. Place the sausage on a plate and set aside. Drain the grease from the skillet.
- Place the skillet back onto a burner set to medium heat and add in the olive oil. When the oil become hot, add in the onion, celery, and thyme. Cook the veggies for about 2-3 minutes until they are soft and turning slightly golden brown.
- Add in the chopped apples and continue to cook for about 2-3 additional minutes until everything is soft and tender. Remove the skillet from the heat.
- Add in the sausage and the breadcrumbs. Stir to combine – taste for seasoning, adding in salt and pepper to taste. Stir in the beaten egg. Set aside until the squash is finished roasting.
Assembly:
- Remove the squash from the oven. Fill the cavity of the squash with the stuffing. Place the pan back into the oven and bake for about 20 minutes until the filling is golden brown and cooked through.
Serve immediately to hungry family and friends!
Nutrition Information (1 squash half):
522 calories • 58gm carbohydrates • 7gm fiber • 22gm protein • 28gm fat • 10gm saturated fat • 1281mg sodium • 101mg cholesterol • 4mg iron • 161mg calcium
Share this:

Pumpkin Bread

It has been officially October for over a week and all I can think about is pumpkins, pumpkins, pumpkins. From picking the perfect pumpkin for a Jack-o-Lantern to finding armloads of mini pumpkins to place all over my house to whipping up our favorite pumpkin recipes, the orange fruit is forefront in my mind.
Of all the pumpkin-related activities that you can do this fall, my favorite thing to do is make pumpkin baked goods. You all know that my absolutely, positively, #1 go-to pumpkin baked good is Mini Pumpkin Chocolate Chip Muffins, but today I’m sharing my family’s ultimate pumpkin treat.
Good Old Fashion Pumpkin Bread.
I always notice that around Labor Day, boxed pumpkin bread mix starts appearing on store shelves in anticipation of the holiday baking rush. As much as I love and use boxed bread/muffin/cake/brownie mix, I think that some things taste better when you make them from scratch… and this pumpkin bread is one of those things. Try it once, and you’ll be hooked (promise!).
This bread has three teams of ingredients and comes together very quickly in the stand mixer. You can also use a hand mixer if that’s what you have.
The first team is the dry ingredient team.

Flour, sugar, baking powder, baking soda salt, cinnamon, nutmeg, and allspice. Blend those together and set aside while you get the second team together.
The second team is the wet ingredient team.

In the bowl of a stand mixer, combine eggs, vegetable oil, and pumpkin puree. If you have homemade pumpkin puree, you are my hero and please use it here (and can you please send me some?). I always have canned pumpkin puree in my pantry from September thru January, so that’s my go-to. Beat the eggs and pumpkin together until combined.
Then, get together the third team… which is water. Yep, measure out ⅔ cup of water into a measuring cup with a spout.
And now you’re ready to make pumpkin bread (and yes, I may have forgotten to take photos but it’s easy!). With the mixer on low, add in the dry ingredients and water alternately, starting and ending with the flour.

Mix the batter until just combined and pour it into two greased loaf pans with a sheet of parchment on the bottom (for easy removal). All that’s left is to bake them at 350 degrees for about 45-60 minutes.
Divine!
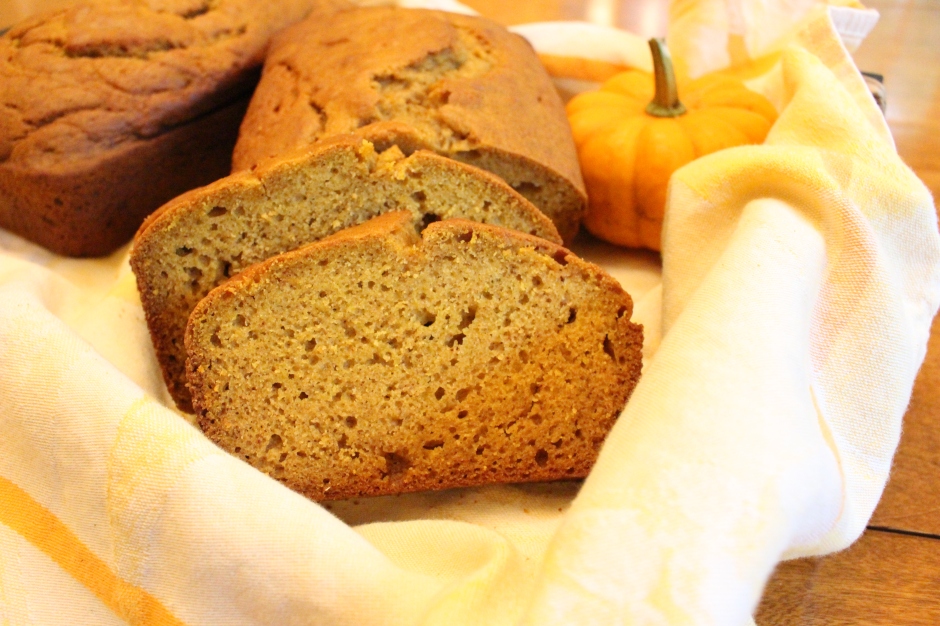
All that’s left is to let it cool slightly in the pans, turn it out onto a cooling rack to cool completely, and then slice up for your family to enjoy.

Or you could keep it all to yourself (I won’t judge!).
So, kiddos, what’s your favorite pumpkin baked good?
Your pumpkin obsessed friend,
C
Pumpkin Bread
Ingredients:
3½ cups all-purpose flour
2 cups granulated sugar
2 teaspoons baking soda
2 teaspoons salt
1 teaspoon baking powder
1 teaspoon cinnamon
1 teaspoon nutmeg
1 teaspoon allspice
4 eggs
1 cup vegetable oil
1-15oz can of pumpkin pureed – about 1⅓ cup homemade pumpkin puree
⅔ cup water
Steps:
- Preheat your oven to 350 degrees. Spray two loaf pans with cooking spray and place a rectangle of parchment paper on the bottom of each pan. An easy way to measure a piece of parchment that will fit is to outline the bottom of the loaf pan on the parchment and cut it out.
- In a large bowl, combine the flour, sugar, baking soda, salt, baking powder, cinnamon, nutmeg, and allspice. Whisk to combine. Set aside.
- In the bowl of a stand mixer (or in a large bowl with a hand mixer), beat together eggs, vegetable oil, and pumpkin puree. With the mixer on low, add in the dry ingredients and water alternatively, starting and ending with the flour. Mix until just combined.
- Pour the batter into the prepared loaf pans and pop the pans into the oven. Bake for 45-50 minutes, or until a toothpick in the center of the bread comes out clean. Cool the bread in the pans for 10 minutes and then turn them out onto a cooling rack to allow them to cool completely.
Enjoy!
Nutrition Information (1 slice):
274 calories • 39gm carbohydrates • 1gm fiber • 4gm protein • 12gm fat • 1gm saturated fat • 313mg sodium • 37mg cholesterol • 2mg iron • 29mg calcium
Share this:

Banana Walnut Pancakes
Happy Saturday, kiddos!
The temperatures outside are now officially fall-like (yay!), which means that it is totally appropriate to bring out all the apple-, pumpkin-, and spice-flavored baked goods that go into hiding the other 8 months out of the year. Fall is definitely my favorite season for food (anyone else?).
To honor the descent of the temperature into the low-60s, I want to share with you a pancake recipe that I tried out a week ago (when it was still 80 degrees outside). You all know my love of banana nut muffins (I’ve made them twice on the blog), so when I had some overripe bananas and the hankering for a spice-flavored breakfast item, inspiration struck.
And Banana Walnut Pancakes were born!
The pancakes start with my regular ‘ole pancake batter.
First, assemble the dry ingredients in a big bowl.

Flour, sugar, baking powder, salt, cinnamon, and nutmeg all get added and then thoroughly whisked together. And perfumes the kitchen with the smell of fall!
The wet ingredients – skim milk and eggs – are whisked in a separate bowl…

… and then poured over the dry ingredients. Gently mix the wet into the dry until just combined. Please don’t overmix your pancake batter – it will never forgive you!

The last two additions to the batter are two overripe bananas that have been thoroughly mashed and some delicious flavorings. You also know that I think whiskey and bananas are a great combo, so I added in some whiskey to the batter along with some vanilla. If you don’t like cooking with alcohol, you can leave it out!
And now, it’s time to cook.
I set a pancake griddle over medium-low heat and sprayed it with cooking spray.

When the griddle was hot, I poured ¼ cup scoops of batter onto the griddle. (this makes the perfect size pancakes)

Then sprinkle on some finely chopped walnuts. I love walnuts in my banana nut muffins, but pecans work here too!

**Side Note: This pancake recipe is great as is, but sometimes you want to be a little extra sweet. I added in some mini chocolate chips to some of the pancakes to try and yep, they were delicious too! **
When the pancake starts to bubble, flip them over.

Allow the pancakes to cook for an additional minute on the other side. And then they’re done!
I usually pop the cooked pancakes onto a wire baking rack set in a 185 degree oven. The pancakes stay warm, but don’t dry out.
When all the pancakes are made, then it’s time to eat!

Serve them up with your favorite pancake syrup!

And dig in.
I hope you enjoy this pancake recipe that will warm you up on a chilly fall morning!
Your pancake flippin’, banana nut muffin lovin’ friend,
C
Banana Walnut Pancakes
Ingredients:
2¼ cups all-purpose flour
4½ tablespoons sugar
3½ teaspoons baking powder
1½ teaspoons salt
1½ teaspoons ground cinnamon
¼ teaspoon ground nutmeg
3 eggs
1¾ cup skim milk
1½ teaspoons vanilla extract
1½ teaspoons whiskey, optional
2 overripe bananas, mashed
½ cup walnuts, finely chopped
Mini chocolate chips, optional
Cooking spray
Steps:
- Preheat oven to 185 degrees. Place pancake griddle over medium-low heat.
- In a large bowl, combine flour, sugar, baking powder, salt, cinnamon, and nutmeg. Whisk to combine.
- In a small bowl, combine eggs and milk. Whisk to combine.
- Slowly pour wet ingredients into the dry ingredients and mix gently to combine – don’t over mix! Add in the mashed bananas, vanilla, and whiskey. Stir to combine.
- Grease preheated pancake griddle with cooking spray. Ladle batter onto the griddle in ¼ cup measures. Sprinkle chopped walnuts over each pancake. Add chocolate chips if desired. When the pancake begins to bubble, flip over and cook for an additional minute until the underside is golden brown. Store cooked pancakes on a wire rack and place rack into the preheated oven.
Serve the pancakes with warm syrup.
Enjoy!
Nutrition Information (3 pancakes):
354 calories • 57gm carbohydrates • 3gm fiber • 12gm protein • 9gm fat • 1.5gm saturated fat • 854mg sodium • 95mg cholesterol • 2.6mg iron • 231mg calcium
Share this:

The End of Hunger Action Month
Happy Last Day of September, everyone!
Can you believe how fast this month has gone?
But today is not just the end of September, but the last day of Hunger Action Month.
This month allowed us to discuss a big issue here on the blog and come together to help our communities fight hunger through our challenge of donating one meal’s worth of groceries to our local food banks.

And it allowed me to share three recipes that I developed for my local food bank, which shows that low-cost food can also be healthy food.
Thank you for joining in on the conversation surrounding hunger in America and helping out in your communities. Hopefully, as we head into the holiday season, you continue to reach out and support your community food programs (Meals on Wheels, food pantries). And show me how you are reaching out to help end hunger in your community using the hashtag #GSFfightshunger.
Because together, we can end hunger.
oxox,
C
Share this:

Lazy Girl Huevos Rancheros

This recipe was born in the tiny galley kitchen of my sister’s apartment. The two foods that E loves the most are eggs and avocados, so she always has a carton of eggs and ripe avocados in her apartment.
During one sister visit, we needed (okay, wanted) to have a hearty breakfast before she headed off to work and I dove into my RD exam studying. Since we were leaving the next day to come back to the homestead, we needed to clean out her fridge. While rummaging through her fridge, we found an almost empty carton of eggs (the horror!), an avocado that was on the verge of going bad, and a jar of salsa.
And Lazy Girl Huevos Rancheros were born.
Huevos Rancheros is a Tex-Mex breakfast dish that consists of sunny-side up or fried eggs that are topped with salsa and/or guacamole and served alongside rice and beans. Our version is the lazy cousin of this breakfast staple – just simple fried eggs topped with avocado and salsa. The essence of the traditional dish is there, but with a speedier, more pantry-friendly twist.
It starts with two fried eggs.
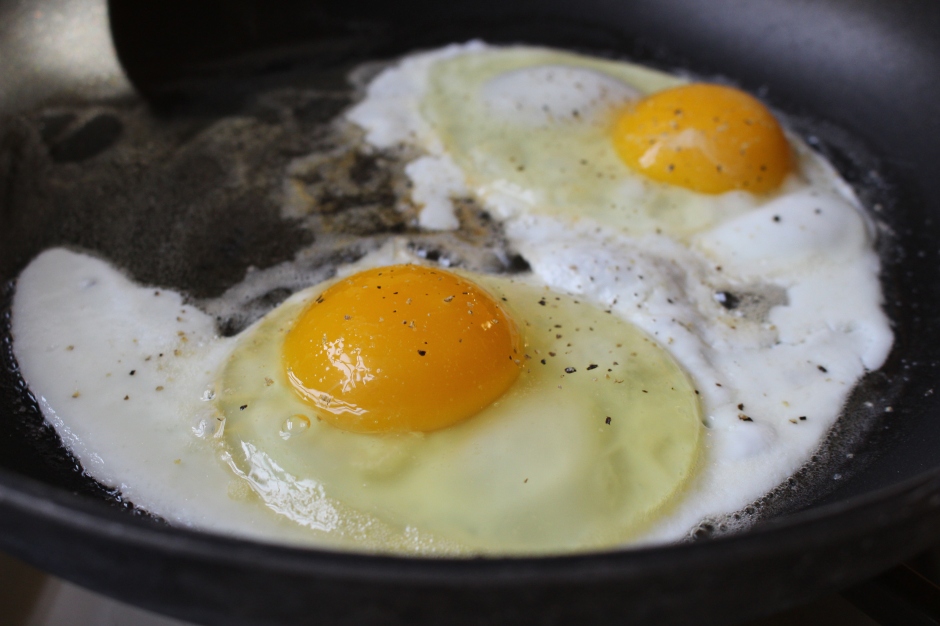
Heat a non-stick skillet with some butter and crack in two eggs. Season with salt and pepper and allow the whites to begin to firm up and bubble on the edges. You can make this dish with sunny side up eggs if you want – this dish is versatile!
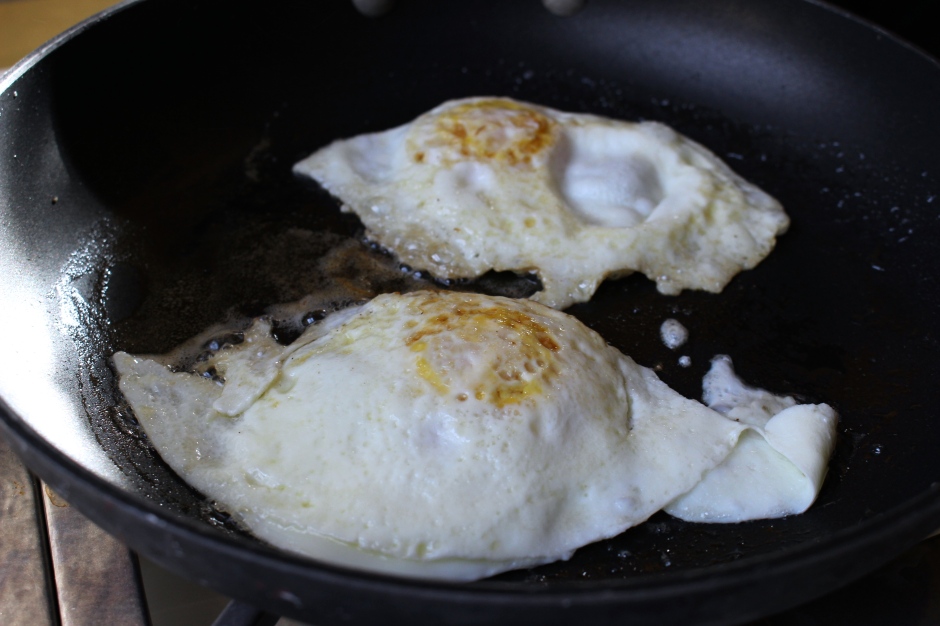
Flip the eggs over and cook them to your preferred level of done-ness. I like my whites more firm with the yolk still a little runny.
Then it’s time to build the Huevos Rancheros!
Gently plop the eggs on a plate…
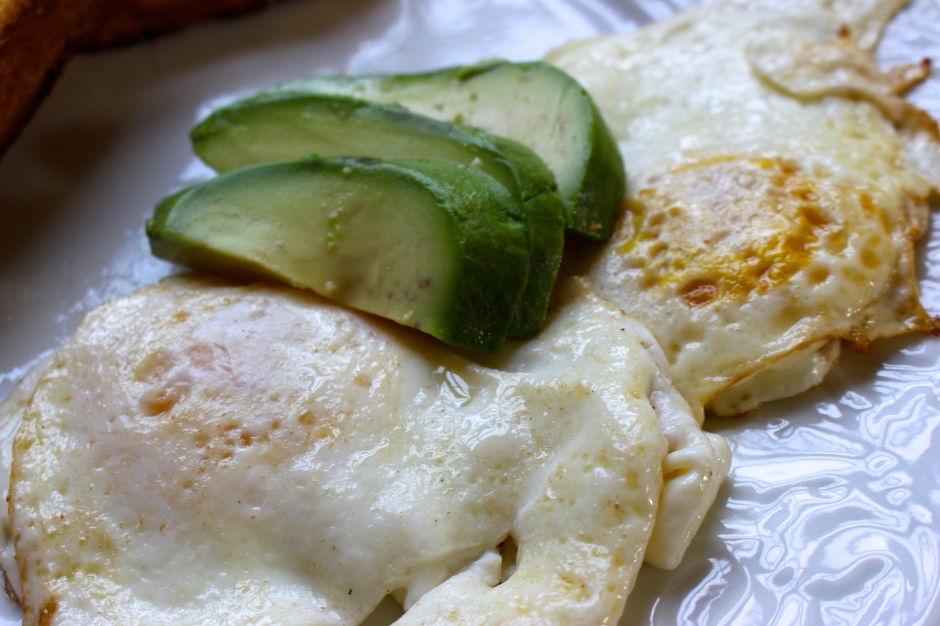
… and add on a few slices of ripe avocado.
And a dollop of salsa (I like either medium or hot salsa on my Huevos Rancheros).
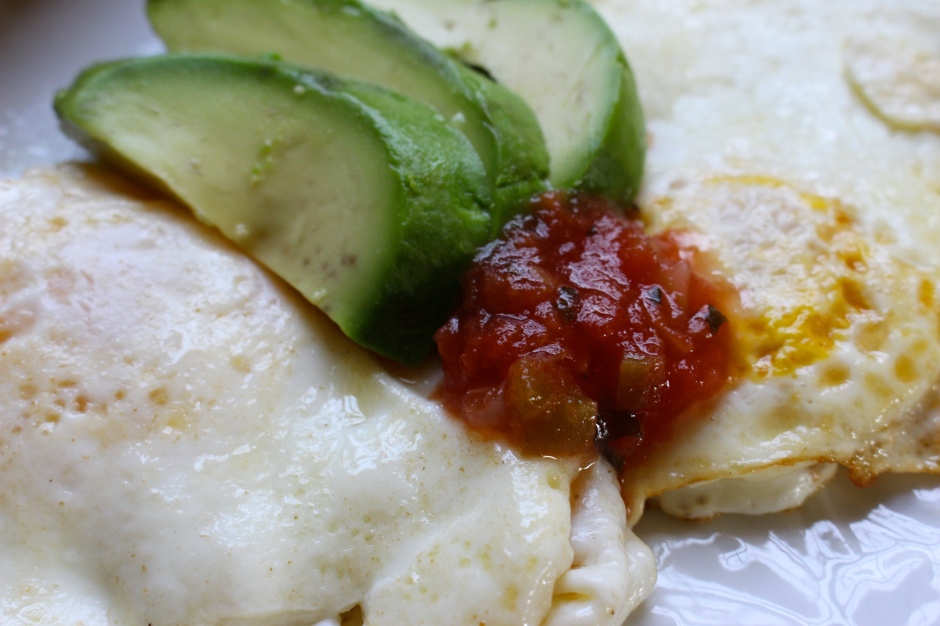
Then you’re DONE!
Yes, it’s that easy.

An easy morning breakfast that is big on flavor, but quick to make! (psst… make it for breakfast today!)
Happy Tuesday, kiddos.
Your lazy breakfast maker,
C
Lazy Girl Huevos Rancheros
Ingredients:
2 teaspoons unsalted butter
2 large eggs
Salt and pepper to taste
¼ medium-sized ripe avocado, sliced and drizzled with lime juice to prevent browning
1-2 tablespoons salsa, homemade or store-bought
Steps:
- In a medium-sized, non-stick skillet, heat butter over medium-low heat. When the butter is melted, gently crack the eggs into the skillet. Cook the eggs until the white becomes opaque on the bottom and begins to set, about 1-2 minutes. Gently flip the eggs over and allow the other side to cook, about 1-2 minutes.
- Remove the eggs from the skillet and gently place them on a plate. Top the eggs with the avocado slices and salsa.
Serve immediately alongside toast, or for a more traditional breakfast, with rice and beans. Enjoy!
Nutrition Information (1 serving):
288 calories • 6gm carbohydrates • 3gm fiber • 14gm protein • 26gm fat • 9gm saturated fat • 322mg sodium • 393mg cholesterol • 1.5mg iron • 65mg calcium

